Cilium数据平面深度解析 1 - 基础连通性
总览
随着bpf/ebpf技术的快速发展,Cilium被认为是Kubernetes生态中最有前景的网络方案。依靠着ebpf灵活、高效、功能和数据分离等特点,Cilium也在多个公有云中被官方支持。
传统的Kubernetes CNI插件大多是基于Linux内核的网络方案,如Flannel基于tunnel(backend可以是vxlan,用户态udp进程等),Calico基于路由(L2网络或者BGP)。在使用这些CNI插件时,靠着内核提供的工具集(如iproute2/tcpdump),我们可以很容易的知道实际packet的路径,如何被转发。但是在使用Cilium后,经常会出现抓不到包,没有任何统计信息的状况,让人摸不着头脑。
这篇文章尝试通过现有工具和源码分析,总结Cilium对packet的处理逻辑。
背景
重要的bpf hook points
- XDP: 驱动设备接收到数据包后最靠前的处理点,在实际创建skb之前。XDP有
native,offload,generic模式。当网卡不支持offload时,尽量使用高版本内核支持native模式。当内核不支持native模式时,可以使用generic模式来模拟。XDP适合用来做DDos保护,防火墙等功能。
以igb driver为例,可以看到XDP的处理位置非常靠前。
// linux source code: igb_main.c
static int igb_clean_rx_irq(struct igb_q_vector *q_vector, const int budget)
{
...
/* retrieve a buffer from the ring */
    if (!skb) {
        unsigned char *hard_start = pktbuf - igb_rx_offset(rx_ring);
        unsigned int offset = pkt_offset + igb_rx_offset(rx_ring);

        // XDP program initiates
        xdp_prepare_buff(&xdp, hard_start, offset, size, true);
#if (PAGE_SIZE > 4096)
        /* At larger PAGE_SIZE, frame_sz depend on len size */
        xdp.frame_sz = igb_rx_frame_truesize(rx_ring, size);
#endif
        // XDP program runs here
        skb = igb_run_xdp(adapter, rx_ring, &xdp);
    }
...
}
在这片文章中,由于使用了缺省配置,没有开启任何策略,XDP没有挂载bpf程序。我们会在之后policy相关的文章里介绍。
- TC: 网络协议栈的初始处理挂载点。在Cilium中大量使用,和基本连通性关联密切,我们重点关注
TC。
// linux source code: dev.c
__netif_receive_skb_core
    | list_for_each_entry_rcu(ptype, &ptype_all, list) {...} // packet capture
    | do_xdp_generic // handle generic xdp
    | sch_handle_ingress // tc ingress
        | tcf_classify
            | __tcf_classify // ebpf program is working here
Cilium Datapath
我们部署Cilium作为Kubernetes的CNI,分析其datapath如何运行。为了让集群网络独立于underlay网络,选择tunnel模式进行部署。
实验环境:
Ubuntu 21.04
Linux kernel 5.10
Cilium 1.12
其他: 缺省配置 (kube-proxy-replacement: disabled; tunnel: vxlan)
部署完成后,每个node会生成一个cilium_host/cilium_net veth pair,一个vxlan设备cilium_vxlan。每个pod的主机侧有个lxcXXXX veth设备。默认使用的cluster-scope IPAM mode会通过CNI给每个node分配一个PodCIDR,在该node上的Pod会得到一个该CIDR的IP。每个node上的cilium_host有一个IP作为该node所有Pod的网关。
podCIDR记录在CiliumNode资源中。
# kubectl get ciliumnodes cilium-worker -o yaml
apiVersion: cilium.io/v2
kind: CiliumNode
...
spec:
  ipam:
    podCIDRs:
    - 10.0.1.0/24
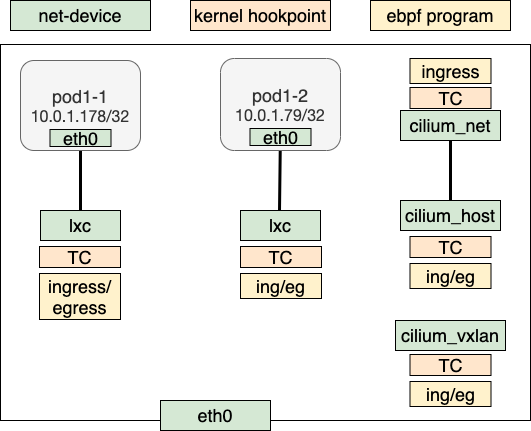
拓扑和bpf program的挂载点如图所示。本篇主要强调基本连通性,我们没有设置任何policy。
可以看到当前部署中ebpf的hook点
lxc(pod eth0的peer veth):TC ingress/TC egresscilium_host(veth netdev): TC ingress/egresscilium_net(cilium_host的peer veth): TC ingresscilium_vxlan(vxlan netdev): TC ingress/egress
下面通过实际场景分析Cilium如何对数据流量做处理。
同node上pod to pod
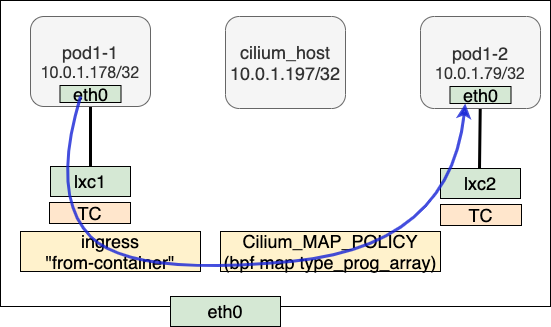
以pod1-1到pod1-2发送端为例。pod1-1 IP为10.0.1.178,目的pod1-2 IP为10.0.1.79,虽然在同一个node CIDR内,由于掩码是32,需要走网关。在该节点上,cilium_host 10.0.1.197是所有pod的网关。
// on pod1-1
/ # ip r
default via 10.0.1.197 dev eth0
10.0.1.197 dev eth0 scope link
我们首先分析ARP的处理。pod1-1发出对网关的ARP request,request的dst IP是10.0.1.197 (cilium_host)。注意这里我们收到的response src MAC并不是cilium-host,而是来自lxc1。Cilium使用了类似于arp_proxy的处理技巧完成一个纯三层的包转发。这里说类似于arp_proxy是因为并没有真的在内核开启此功能,而是利用了lxc1上面挂载的bpf program完成。
// bpf_lxc.c
__section("from-container")
int handle_xgress(struct __ctx_buff *ctx)
{
	...
	switch (proto) {
    ...
#elif defined(ENABLE_ARP_RESPONDER)
	case bpf_htons(ETH_P_ARP):
		ep_tail_call(ctx, CILIUM_CALL_ARP); // tail_call tail_handle_arp
		ret = DROP_MISSED_TAIL_CALL;
		break;
#endif /* ENABLE_ARP_RESPONDER */
    ...
}

__section_tail(CILIUM_MAP_CALLS, CILIUM_CALL_ARP)
int tail_handle_arp(struct __ctx_buff *ctx)
{
    union macaddr mac = NODE_MAC; // dst mac is populated with NODE_MAC
	...
	return arp_respond(ctx, &mac, tip, &smac, sip, 0);
}

static __always_inline int
arp_respond(struct __ctx_buff *ctx, union macaddr *smac, __be32 sip,
	    union macaddr *dmac, __be32 tip, int direction)
{
	...
	return ctx_redirect(ctx, ctx_get_ifindex(ctx), direction); // redirect skb to src iface
    ...
}
对于普通的IP packet,我们对照源码分析处理流程,以IPv4为例。ctx(也就是skb)经过一系列tail_call后,被handle_ipv4_from_lxc处理。
Call stack如下:
// bpf_lxc.c
handle_xgress(struct __ctx_buff *ctx)
  | ep_tail_call(ctx, CILIUM_CALL_IPV4_FROM_LXC)
    | tail_handle_ipv4(struct __ctx_buff *ctx)
      | __tail_handle_ipv4(ctx)
        | tail_handle_ipv4_cont(struct __ctx_buff *ctx)
          | handle_ipv4_from_lxc(ctx, &dst_id)
            | lookup_ip4_endpoint(ip4) // get local endpoint (pod or host)
            | ipv4_local_delivery(...)
              | ipv4_l3(ctx,...) // ttl-1 & update mac header
              | tail_call_dynamic(ctx, &POLICY_CALL_MAP, ep->lxc_id) // jump to destination pod's bpf program for policy enforcement
                | handle_policy(...)
                  | tail_ipv4_ct_ingress_policy_only(...)
                    | tail_ipv4_policy(...)
                      | ipv4_policy(...)
                        | redirect_ep(...) // redirect to dst iface
经过CT等流程后,lookup_ip4_endpoint查找bpf map cilium_lxc拿到IP对应的endpoint info信息。
root@cilium-worker2:/home/cilium# cilium map get cilium_lxc
Key            Value                                                                               State  Error
10.0.1.51:0    id=51    flags=0x0000 ifindex=8   mac=AE:3A:52:A3:EC:B3 nodemac=0A:5A:DE:B8:D8:F4   sync
10.0.1.9:0     id=2389  flags=0x0000 ifindex=10  mac=A6:0D:28:CA:4A:85 nodemac=5A:01:4A:68:C4:C4   sync
10.0.1.18:0    id=2400  flags=0x0000 ifindex=12  mac=EE:9D:C0:B1:94:34 nodemac=12:3F:87:06:72:79   sync
10.0.1.178:0   id=1272  flags=0x0000 ifindex=14  mac=66:FE:F8:92:BF:AF nodemac=5A:03:C6:E1:49:D2   sync
10.0.1.79:0    id=436   flags=0x0000 ifindex=16  mac=32:ED:0B:F8:18:E9 nodemac=C2:8B:75:D9:5F:EC   sync
在ipv4_local_delivery中,首先对IP报文做l3处理(包括ttl-1和mac地址更新)。tail_call到目的lxc的bpf program做NAT和policy enforcement(部署中暂无policy),最后通过redirect_ep传给目的endpoint。
需要注意的是redirect_ep会根据宏定义决定是直接发送给对端的lxc还是与之相连的pod内的eth0,在我们的部署中发现,内核版本会影响实际的转发逻辑。5.10内核下会直接调用ctx_redirect_peer发送到最终的pod1-2的eth0。
接收端的bpf program挂在lxc的egress方向。接收端同样调用ipv4_policy做redirect。但在我们的部署环境中,egress不起什么作用。
// bpf_lxc.c
__section("to-container")
int handle_to_container(struct __ctx_buff *ctx)
{
    ...
    case bpf_htons(ETH_P_IP):
		ep_tail_call(ctx, CILIUM_CALL_IPV4_CT_INGRESS);
		ret = DROP_MISSED_TAIL_CALL;
		break;
    ...
}
// Call stack
| tail_ipv4_to_endpoint
  | ipv4_policy
    | redirect_ep(ctx, ifindex, from_host) // redirect to dst iface
跨node的pod to pod
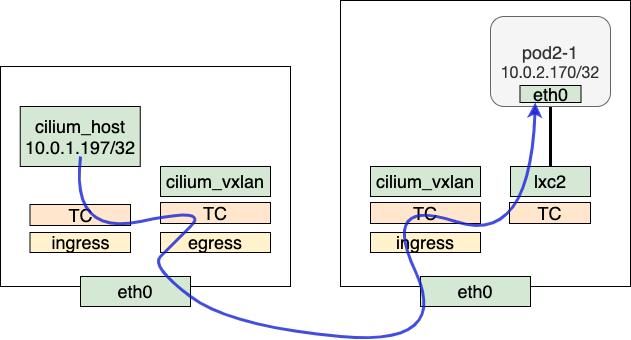
不同node上pod到pod需要经过cilium_vxlan封包以overlay的方式发送到对端。以pod1-1到pod2-1为例,发送阶段的处理方式在前半段和同节点类似,不同的是在进入handle_ipv4_from_lxc后会在bpf map cilium_ipcache中查询。查询到目的IP对应的tunnelpoint为远端node,进入encap_and_redirect_lxc流程,在这里会对从pod里发出的原始packet做encap,encap流程会填上tunnel key,包含remote IP,VNI ID等信息。encap完成后,redirect到cilium_vxlan,剩下的由kernel vxlan进行处理,并经由协议栈发送到对端node。
root@cilium-worker:/home/cilium# cilium map get cilium_ipcache
Key             Value                                                   State   Error
10.0.2.158/32   identity=13789 encryptkey=0 tunnelendpoint=172.18.0.5   sync
10.0.1.214/32   identity=19140 encryptkey=0 tunnelendpoint=172.18.0.5   sync
10.0.1.213/32   identity=62536 encryptkey=0 tunnelendpoint=0.0.0.0      sync
0.0.0.0/0       identity=2 encryptkey=0 tunnelendpoint=0.0.0.0          sync
172.18.0.4/32   identity=1 encryptkey=0 tunnelendpoint=0.0.0.0          sync
10.0.1.116/32   identity=9049 encryptkey=0 tunnelendpoint=0.0.0.0       sync
Call stack如下:
// bpf_lxc.c
handle_xgress(struct __ctx_buff *ctx)
  | ep_tail_call(ctx, CILIUM_CALL_IPV4_FROM_LXC)
    | tail_handle_ipv4(struct __ctx_buff *ctx)
      | __tail_handle_ipv4(ctx)
        | tail_handle_ipv4_cont(struct __ctx_buff *ctx)
          | handle_ipv4_from_lxc(ctx, &dst_id)
            | encap_and_redirect_lxc(...) // tunnel_endpoint is fetched from cilum_ipcache map
              | __encap_and_redirect_with_nodeid(...)
                | __encap_with_nodeid(...)
                | ctx_redirect(ctx, ENCAP_IFINDEX, 0) // redirect to vxlan netdev
在接收端,cilium_vxlan从物理网络收到数据,经过vxlan设备的decap之后,进入tc ingress ("from-overlay")被bpf program处理。
// bpf_overlay.c
__section("from-overlay")
int from_overlay(struct __ctx_buff *ctx)
{
    ...
    case bpf_htons(ETH_P_IP):
#ifdef ENABLE_IPV4
		ep_tail_call(ctx, CILIUM_CALL_IPV4_FROM_OVERLAY);
		ret = DROP_MISSED_TAIL_CALL;
    ...
 }

__section_tail(CILIUM_MAP_CALLS, CILIUM_CALL_IPV4_FROM_OVERLAY)
int tail_handle_ipv4(struct __ctx_buff *ctx)
{
	__u32 src_identity = 0;
	int ret = handle_ipv4(ctx, &src_identity);
  ...
}
在handle_ipv4中调用ipcache_lookup4,在bpf map cilium_ipcache里找到本地的identity,调用ipv4_local_delivery转发到本地的interface。由于ipv4_local_delivery和第一部分中的call stack一致,在这里不再赘述。
接收端call stack
//  bpf_overlay.c
| tail_handle_ipv4(struct __ctx_buff *ctx)
  | handle_ipv4(ctx, &src_identity)
    | ipcache_lookup4(...) // get dest identity
    | ipv4_local_delivery(...) // deliver to local identity, same steps with previous call stack
node to pod

我们以跨节点的node to pod作为典型例子。在发送端,根据路由表,cilium_host是cluster内所有podCIDR的网关,node to pod的过程可以看为是cilium_host到对端pod的过程。
root@cilium-worker2:/home/cilium# ip r
default via 172.18.0.1 dev eth0
10.0.0.0/24 via 10.0.1.197 dev cilium_host src 10.0.1.197 mtu 1450
10.0.1.0/24 via 10.0.1.197 dev cilium_host src 10.0.1.197
10.0.2.0/24 via 10.0.1.197 dev cilium_host src 10.0.1.197 mtu 1450
10.0.1.197 dev cilium_host scope link
172.18.0.0/16 dev eth0 proto kernel scope link src 172.18.0.3
整体流程和pod-pod通信类似,call stack如下。
// bpf_host.c
handle_netdev(struct __ctx_buff *ctx, const bool from_host)
  | do_netdev(ctx, proto, from_host)
    | tail_handle_ipv4_from_host(struct __ctx_buff *ctx)
      | tail_handle_ipv4(...)
        | handle_ipv4(...)
          | encap_and_redirect_with_nodeid(...) // encap and send to remote tunnel endpoint
接收端也和pod-pod类似,通过cilium_vxlan后,查询bpf map cilium_lxc判断是node上的cilium_host,发送过去。
//  bpf_overlay.c
| tail_handle_ipv4(struct __ctx_buff *ctx)
  | handle_ipv4(ctx, &src_identity)
    | ep = lookup_ip4_endpoint(ip4) // look up endpoint from cilium_lxc
    | if (ep->flags & ENDPOINT_F_HOST)
      | goto to_host
      | to_host:
        | ipv4_l3(...) // update ttl and mac addresses
        | ctx_redirect(ctx, HOST_IFINDEX, 0) // redirect to cilium_host
pod to service (clusterIP)
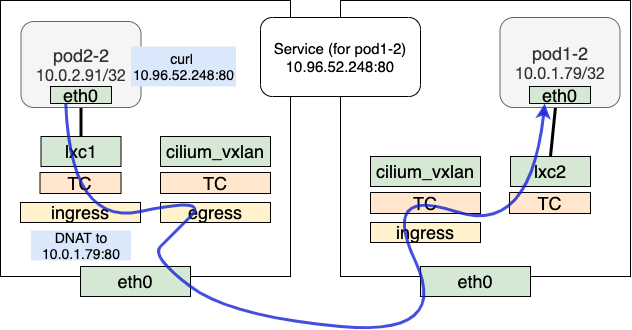
pod to service的整体流程和pod-to-pod类似。在发送端,不同之处在进行__tail_handle_ipv4处理时,查看bpf map cilium_lb4_services_v2是否有对应的service出现,如果有,则进入DNAT流程:做CT处理,并查找bpf map cilium_lb4_backends_v2确定对应的后端,将clusterIP换成实际的后端IP。
root@cilium-worker:/home/cilium# cilium map get cilium_lb4_services_v2
Key               Value               State   Error
10.96.0.1:443     0 1 (1) [0x0 0x0]   sync
10.96.0.10:53     0 2 (2) [0x0 0x0]   sync
10.96.0.10:9153   0 2 (3) [0x0 0x0]   sync
10.96.52.248:80   0 1 (5) [0x0 0x0]   sync
root@cilium-worker:/home/cilium# cilium map get cilium_lb4_backends_v2
Key   Value                   State   Error
4     ANY://10.0.2.230:53     sync
5     ANY://10.0.2.230:9153   sync
7     ANY://10.0.1.79:80      sync
1     ANY://172.18.0.4:6443   sync
2     ANY://10.0.1.9:53       sync
3     ANY://10.0.1.9:9153     sync
DNAT完成后,后续的转发流程与pod-to-pod相同。
// bpf_lxc.c
handle_xgress(struct __ctx_buff *ctx)
  | ep_tail_call(ctx, CILIUM_CALL_IPV4_FROM_LXC)
    | tail_handle_ipv4(struct __ctx_buff *ctx)
      | __tail_handle_ipv4(ctx)
        | lb4_lookup_service(...) // lookup service map
        | lb4_local(...) // handle CT & DNAT
        | tail_handle_ipv4_cont(struct __ctx_buff *ctx)
          | handle_ipv4_from_lxc(ctx, &dst_id)
            | encap_and_redirect_lxc(...) // tunnel_endpoint is fetched from cilum_ipcache map
              | __encap_and_redirect_with_nodeid(...)
                | __encap_with_nodeid(...)
                | ctx_redirect(ctx, ENCAP_IFINDEX, 0) // redirect to vxlan netdev
收到reply时,接收端做reverse NAT,完成src IP到clusterIP的转换,再将packet转到lxc。
// Call stack
| tail_ipv4_to_endpoint
  | ipv4_policy
    | lb4_rev_nat // reverse nat
      | map_lookup_elem(&LB4_REVERSE_NAT_MAP, ...) // lookup reverset nat map
      | __lb4_rev_nat // replace source IP
    | redirect_ep(ctx, ifindex, from_host) // redirect to dest iface
pod to external
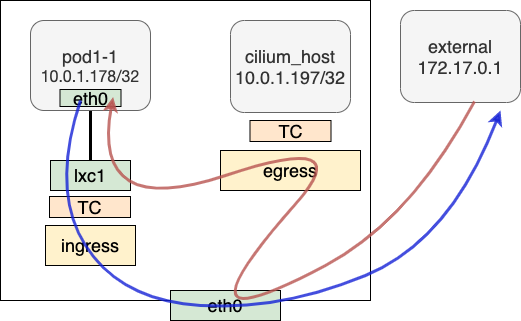
pod to external(cluster外的某个地址)的packet在发送时经过lxc1挂载的tc ingress,ipv4_l3做简单l3处理后,送往协议栈。再经由kube-proxy做Masquerade从主机发出。
handle_xgress(struct __ctx_buff *ctx)
  | ep_tail_call(ctx, CILIUM_CALL_IPV4_FROM_LXC)
    | tail_handle_ipv4(struct __ctx_buff *ctx)
      | __tail_handle_ipv4(ctx)
        | tail_handle_ipv4_cont(struct __ctx_buff *ctx)
          | handle_ipv4_from_lxc(ctx, &dst_id)
            | ret = encap_and_redirect_lxc(...)
            | if (ret == DROP_NO_TUNNEL_ENDPOINT) goto pass_to_stack
            | pass_to_stack: ipv4_l3(...)
            | return to stack
接收response时,主机侧根据出方向Masquerade的情况做地址转换,转换后根据主机路由表发给cilium_host。上面挂载的bpf program判断这是外部进来的packet,redirect给pod1-1对应的lxc1。
总结
本文通过实际场景和Cilium代码的对照分析,明确了Cilium datapath处理数据包的过程。里面涉及到一定的bpf和内核背景知识,我们将在后续的文章中展开说来。
Reference
1. BPF and XDP Reference Guide
2. Life of a Packet in Cilium: Discovering the Pod-to-Service Traffic Path and BPF Processing Logics